Creating a new credit note
Creating from the original invoice
Firstly, navigate to the original invoice. Please note that this is the invoice that you originally raised and now needs crediting (not an invoice that you're looking to reduce the payment required).
When viewing the original invoice, use the Order actions button in the top-right and choose the Raise credit note option. You'll be presented with the option to choose how many of each item on the invoice needs to be credited (and the value paid for each item will automatically be used on the credit note).
Please note that if there were any "invoice-level" discounts/charges (i.e. those below the product list, but before the final total), then you may need to account for these manually on the credit note before finalising it.
For multi-currency invoices: Credit notes will automatically use the same currency as the original invoice, ensuring the credited amount matches what was originally charged.
Creating without associating with the original invoice
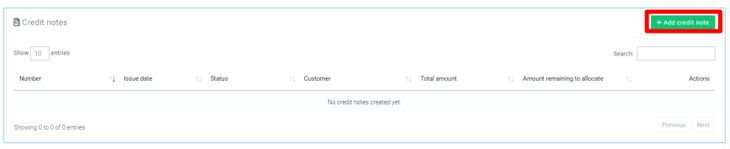
If the original invoice that's resulted in you needing to raise a credit note isn't in Breww (e.g. it was issued from a previous platform before you moved to Breww), then to raise the credit note, go to Customers in the main menu, then find the customer and click onto the Sales orders & credit notes tab. If you scroll down in this tab, there is an Add credit note button.
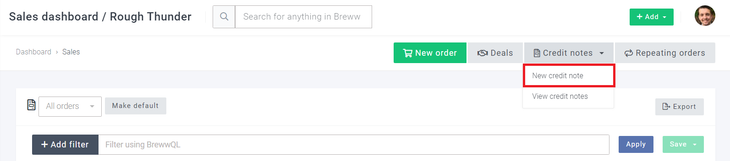
It is also possible to raise credit notes from the Sales page in Breww. To do this, you will need to navigate to Sales->Credit Notes->New credit note
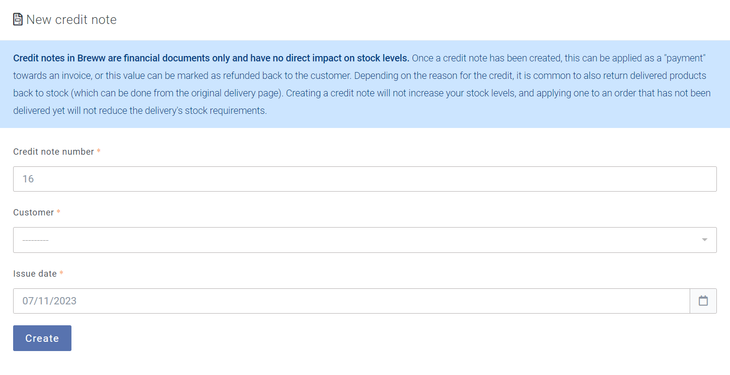
Either option will open the New credit note page, where the credit note number, customer and issue date are set. (Both the issue date and credit note number will be prefilled but can be changed, and if using the first method and creating the credit note from a customer Sales orders & credit notes tab, then the customer will also be prefilled, though it can also be changed at this point too)
Multi-currency credit notes
Credit notes support multi-currency operations:
- When created from an invoice, they inherit the invoice's currency
- For standalone credit notes, they use the customer's configured currency if set, otherwise the base currency
- All credit notes display base currency equivalents for accurate reporting
- Exchange rates are locked at the credit note date to ensure consistency
Filling out a credit note
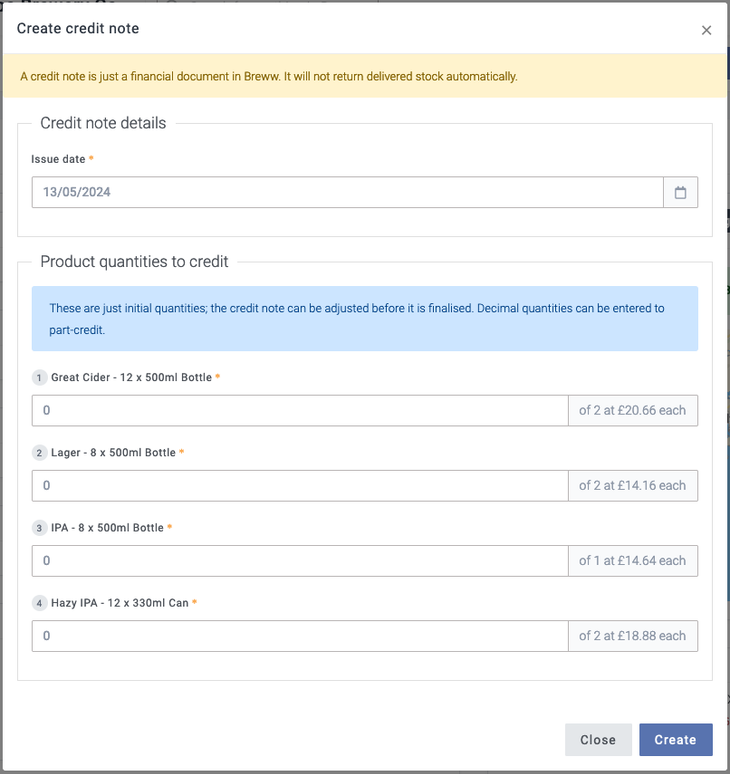
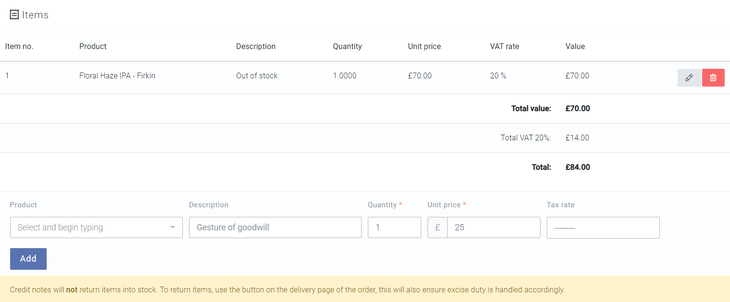
Once you have raised the credit note itself, it will be in a draft state, and you will be able to add "items." Items on a credit note in Breww will most likely be products or services you sell, but they can also be used to credit a customer a specific value for anything you choose, and this does not have to be something you actually sell in Breww.
Crediting a customer for products you sell
To credit a customer for a product you sell, you will need to scroll down to the items section of the newly created credit note and select a product using the dropdown. Doing so will populate the unit price automatically.
If the credit note is associated with its "original invoice", and the product selected was sold on the original invoice, then the price paid for the product on that invoice will be used automatically.
If there's no original invoice set, or the product wasn't sold on the original invoice, then the price will be taken from the price book assigned to that customer at the time the credit note was created.
In either case, we'd recommend double-checking that the value being credited matches what you intended and matches what was originally paid. Any invoice-level discounts/charges (those shown after the products list and just before the final total) will not be automatically considered when the value to credit for a product it determined.
You may also add a description alongside the product, which will appear in brackets on the final credit note PDF document next to it.
Once all the line item details are correct, you can use the Add button to create that line on the credit note.
It is important to note that credit notes will not return items to stock. To return items, use the Return items button on the delivery page of the order; this will also ensure excise duty is handled accordingly (where applicable).

Crediting a customer for anything other than a product
If you wish to credit a customer for anything that is not a product, the process is similar, but you will leave the product field empty and instead enter a description, quantity, and unit price and ensure the tax rate is correct. This will add a line to the credit note that is not associated with a product.
Finalising and allocating credit notes towards invoices
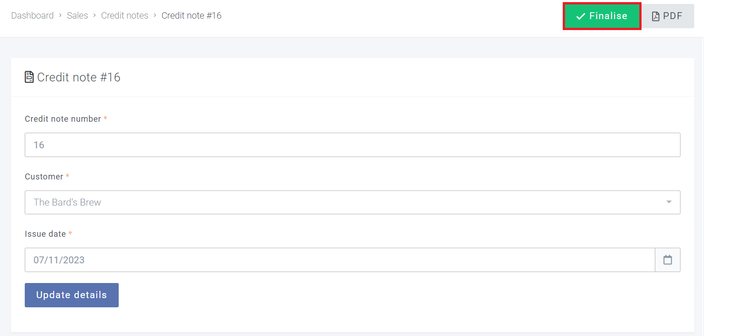
Once you have added all items to a credit note and are happy that all the relevant details are correct, you can finalise the credit note. To finalise a credit note, go to the top of the page and use the Finalise button. A warning will pop up asking you to confirm this, as it cannot be undone. The action of finalising a credit note will also upload it to an integrated accountancy platform if you have one set up and the option to sync credit notes is turned on.
Please note that the credit notes and credit note allocations are only synced from Breww to your accountancy platform. This means that all credit notes for customers in Breww should be created and allocated in Breww. Any invoices raised for a customer in your accountancy platform directly will not be synced with Breww, and equally, any allocations made directly in your accountancy platform will also not be synced to Breww regardless of whether the credit note was raised in Breww.
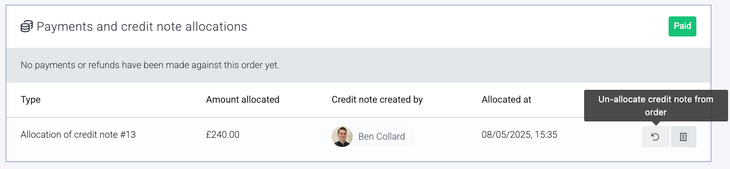
Once finalised, credit notes can then be allocated to orders/invoices by using the Allocate credit note to order button in the screenshot below; you can find this by scrolling down slightly on the order page.

Allocating a credit note to an invoice reduces the amount due for payment on the invoice but doesn't change the invoice value/total. It can be considered very similar to a payment.
Recording that you have refunded the money to the customer
In some cases, you might be refunding the money to your customer, rather than allocating it to a later invoice. To do this, when viewing the credit note, use the Allocate button followed by the Make cash refund option.
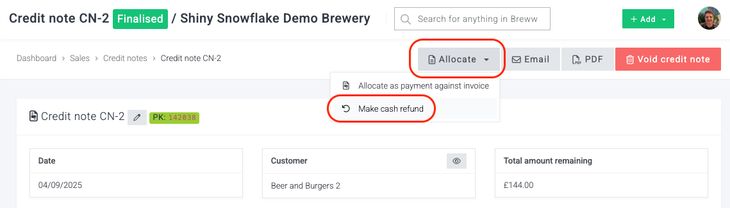
Remember that you still need to give the money back to the customer yourself directly. This tool just allows you to let Breww know this has been done and will ensure that Breww doesn't think the credit amount is still available to be allocated to future invoices.
Emailing credit notes to customers
Credit notes are not emailed automatically to customers, but you can easily send them out once they are finalised by opening the credit note in Breww and using the Email button at the top of the page.

Voiding a credit note
You will be able to 'Void' a credit note by selecting the Void credit note button on the credit note. You will not have the ability to void the credit note if it has already been allocated to an order. However, you will be able to unallocate the credit note from the order by selecting the button shown below. Once you have done this, this will then allow you to void the credit note.